Team Tools · Order System
Order System Manual
Between Sept 18 and Oct 10, 2026, almost every staff screen in the Revival order system got a new design, plus several new tools. Read this once from top to bottom, then take the short knowledge check at the end.
What changed
| Area | What's new for you |
|---|---|
| Logging in | A 4-digit PIN locks the screen after 5 minutes idle; new staff set their own password on first login |
| Home screen | Tiles, a customer search, and orders listed by status; the sidebar starts collapsed |
| Creating orders | One redesigned Create Order form, an Awaiting prescription switch, Customer has frame, Ship to customer, and Save & print label in one step |
| Non-Rx orders | A fast order for plano, transition, reader and plano progressive lenses (formerly Quick order) |
| Awaiting RX | Start an order before the prescription arrives; the customer uploads it from a text link |
| Labels | Bigger 4x6 label that folds in thirds, with black flags for anything unusual |
| Customer profile | New design, Complete several orders at once, reprint labels, Edit only until ready |
| Shipping | Buy a shipping label through Shippo; tracking is texted to the customer |
| Cherry Optical | An orange alert when a customer's 101-day half-off window is open, and 1/2 OFF on the label |
| Owners | Manage users, assign PINs, edit customer text messages |
If something in the app doesn't match this manual, tell a manager.
Logging in and the PIN lock
You log in once with your username and password. After that, your 4-digit PIN gets you back in whenever the screen locks.
Your first login
- Go to the staff login page and enter the username and temporary password your manager gave you.
- The app sends you straight to a Set new password page. Choose your own password; you can't use anything else until you do.
- Ask your manager for your PIN. Staff can't choose or change their own PIN.
The PIN lock
- After 5 minutes with no activity, the screen locks and asks for your PIN.
- Actively using a page (typing, clicking) keeps it unlocked.
- After 5 wrong PINs in a row, you're logged out and must sign in with your password again.
- Everything you do is recorded under your name, so never share your PIN or unlock the screen for someone else.
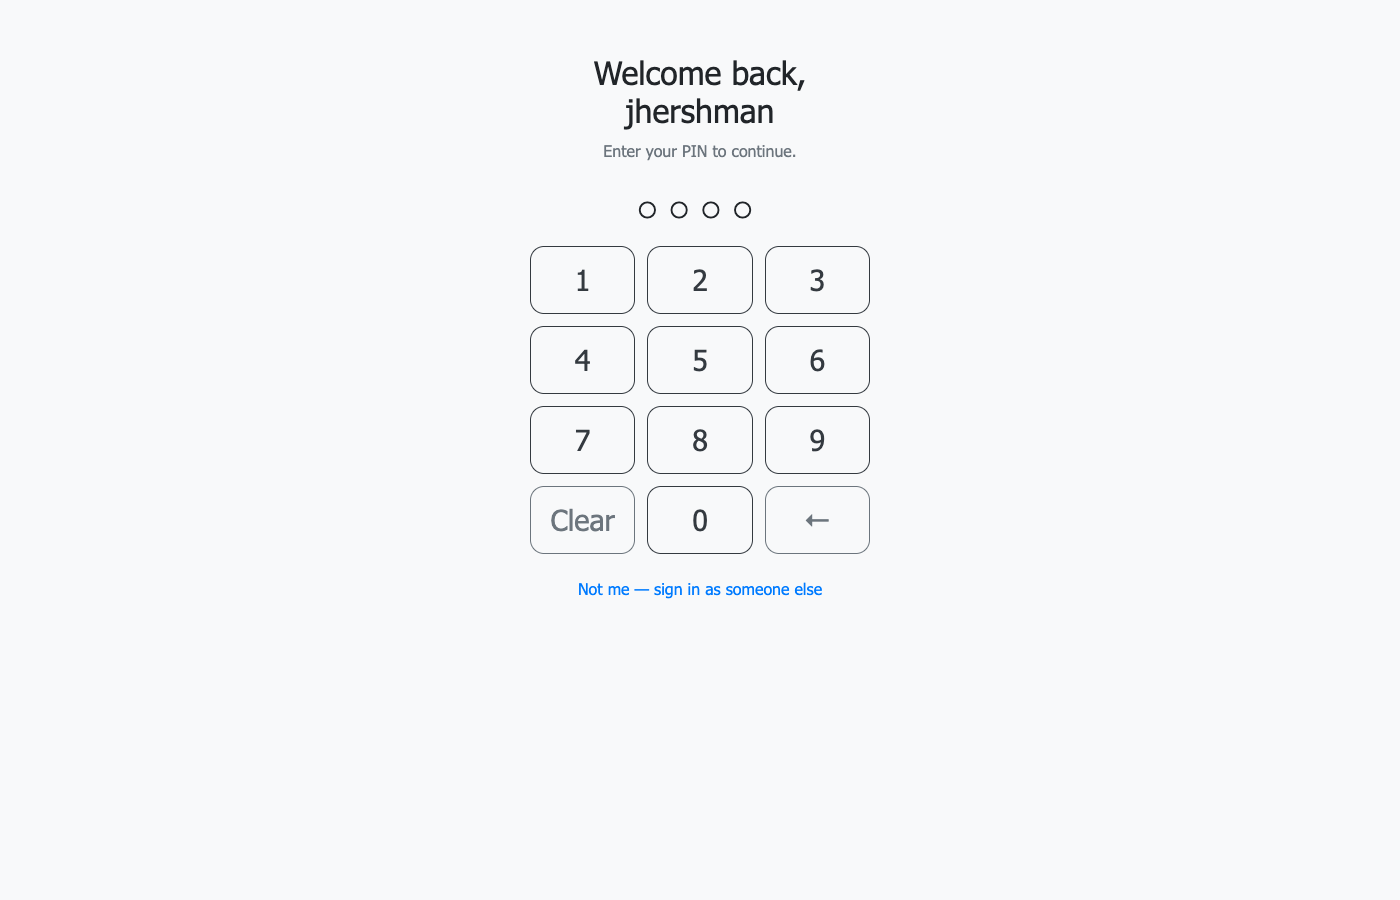
If the lock interrupts an order: Create Order and Non-Rx order save your progress in the browser. After you enter your PIN, the form offers to resume where you left off.
Home screen, Clients and Orders
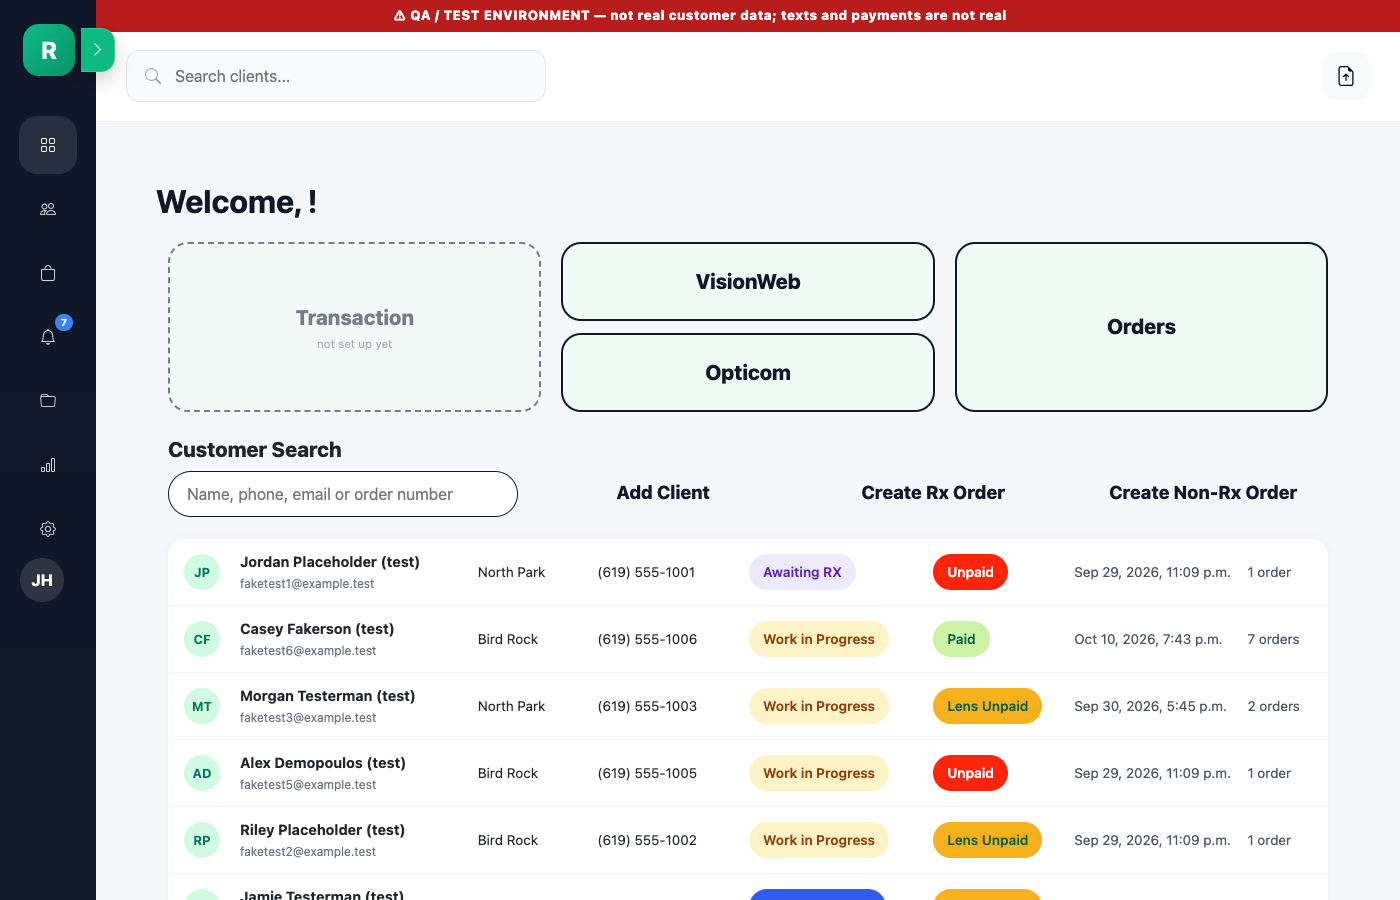
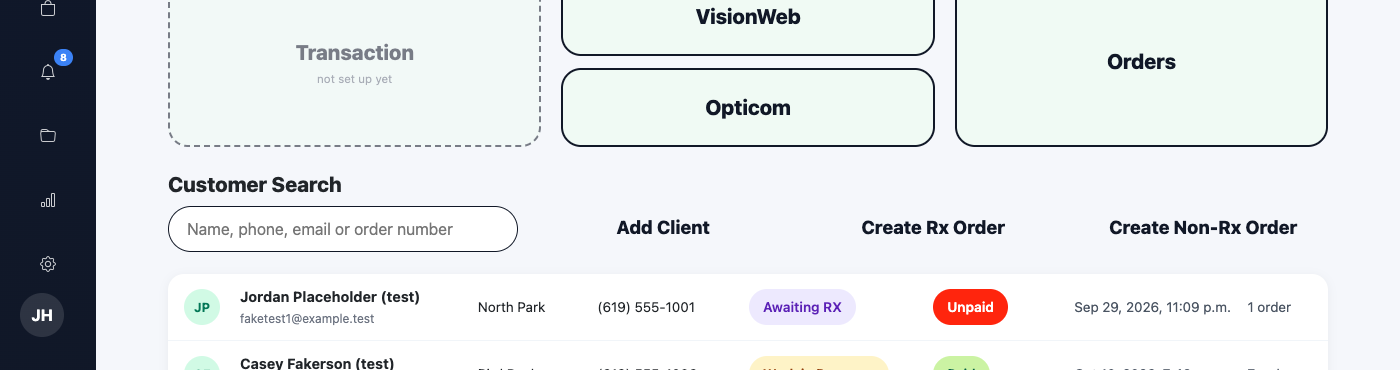
Start most tasks from the home screen: search for the customer, then click their row.
Home screen
- Tiles across the top, including Create Rx Order and Create Non-Rx Order.
- A customer search, and recent orders listed by status, one row per customer.
- The sidebar starts collapsed. Hover over an icon to see its name. The notifications bell lives in the sidebar.
- From a notification, Add to customer profile files it on that customer.
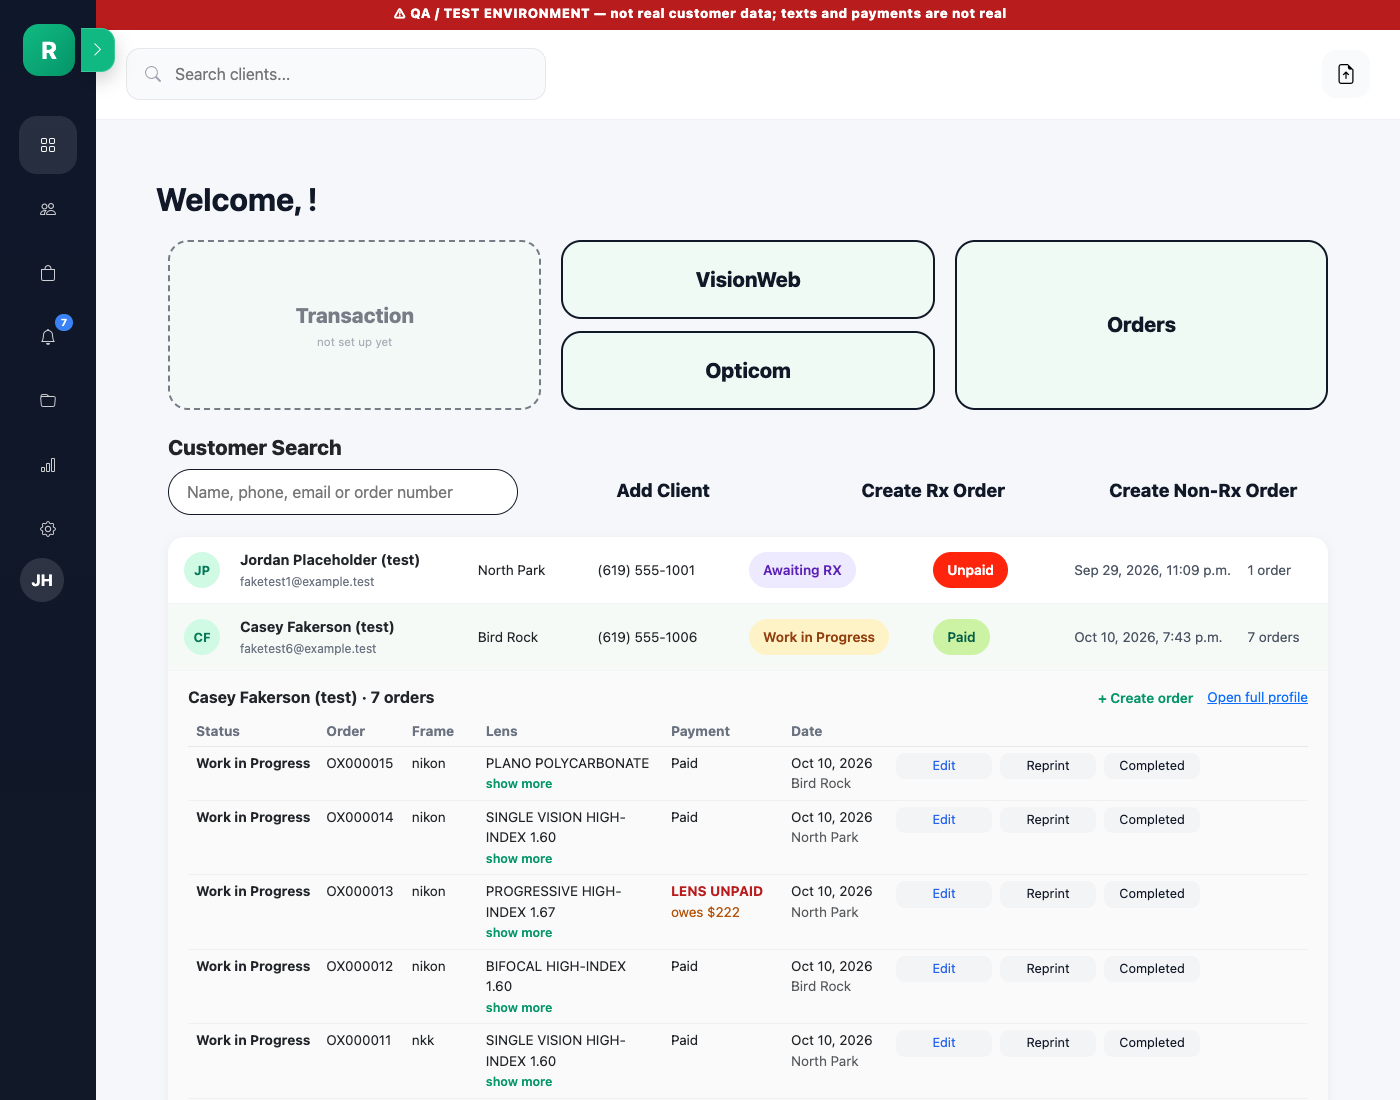
Click any customer's row and all their orders open right underneath, without leaving the home screen. From there you can Edit, Reprint, or mark Completed, see what's still owed, click show more for lens details, or jump to + Create order or Open full profile. Click the row again to close it.
Clients page
- The store dropdown sits under the Store label and lists North Park, Bird Rock, then All stores.
- Press Enter in the search box to search.
- Add client opens the new customer form. After saving, you land on that customer's profile. You can save a customer without an RX.
- Delete Client now asks you to confirm first.
- Clicking a customer opens a box with their orders, with show more / show less for lens details, plus Open full profile and Create order links.
Orders page
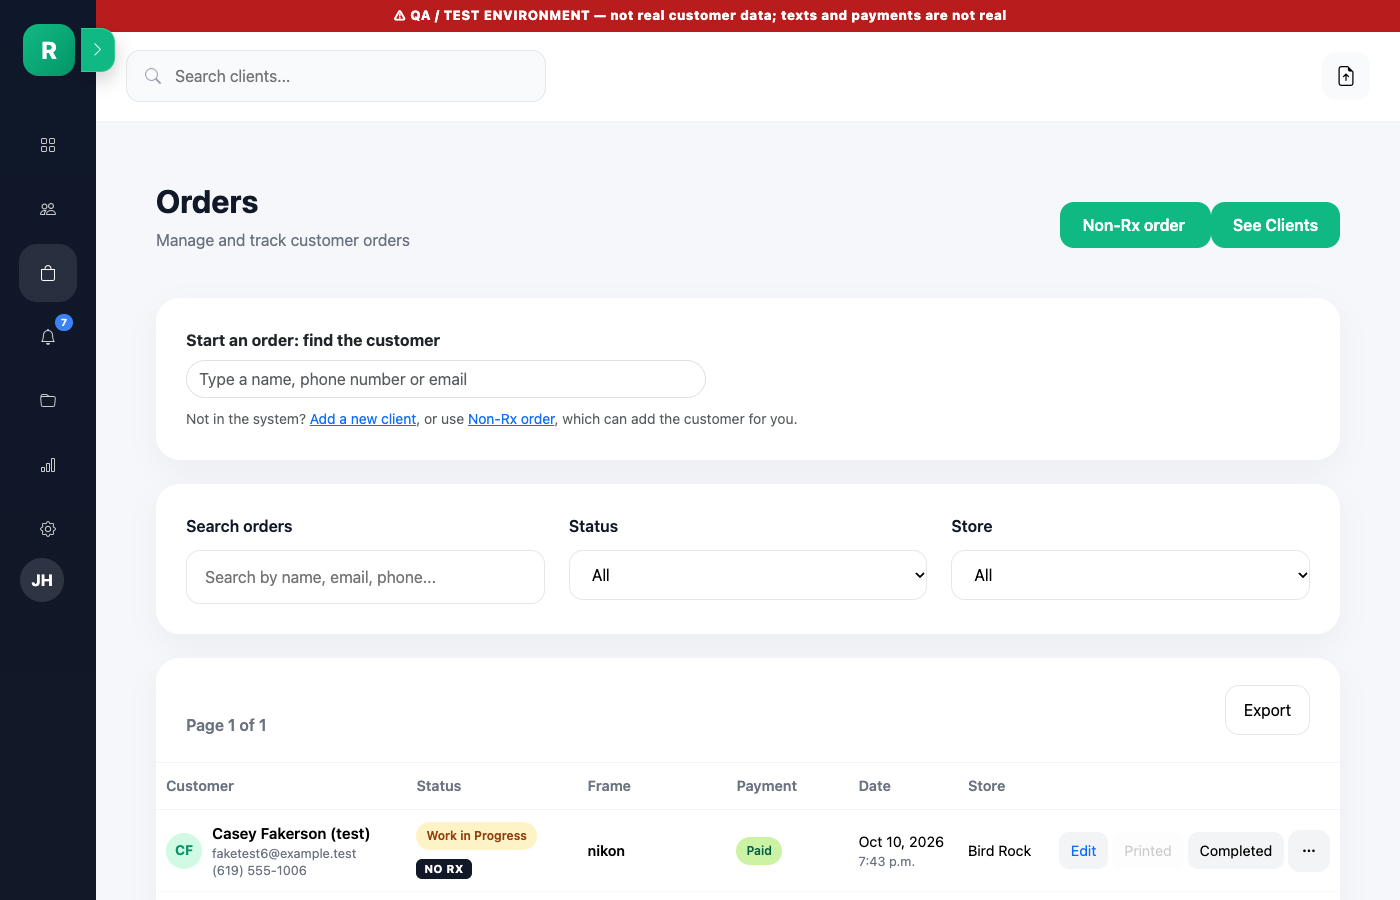
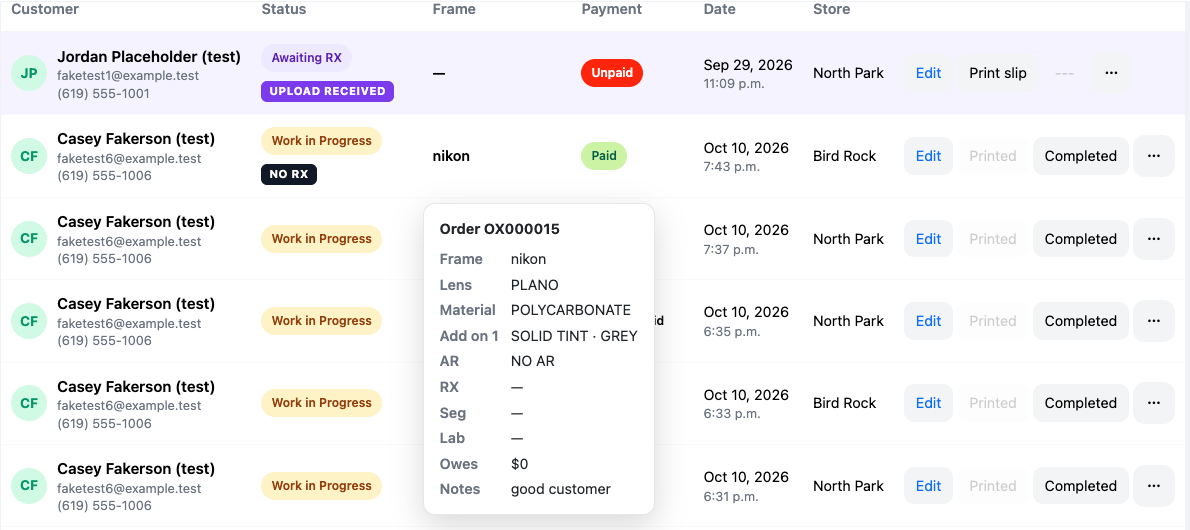
- A compact list with frame info.
- Hover over the Frame (or tap it on an iPad or phone) to see the full order details in a pop-up card: frame, lens, material, add-ons, AR, RX type, Seg, lab, what's owed, and notes.
- Badges call out PRISM, +CYL (plus-cylinder RX) and Unpaid orders.
- Click a customer's name to open their profile.
Creating an order and printing its label
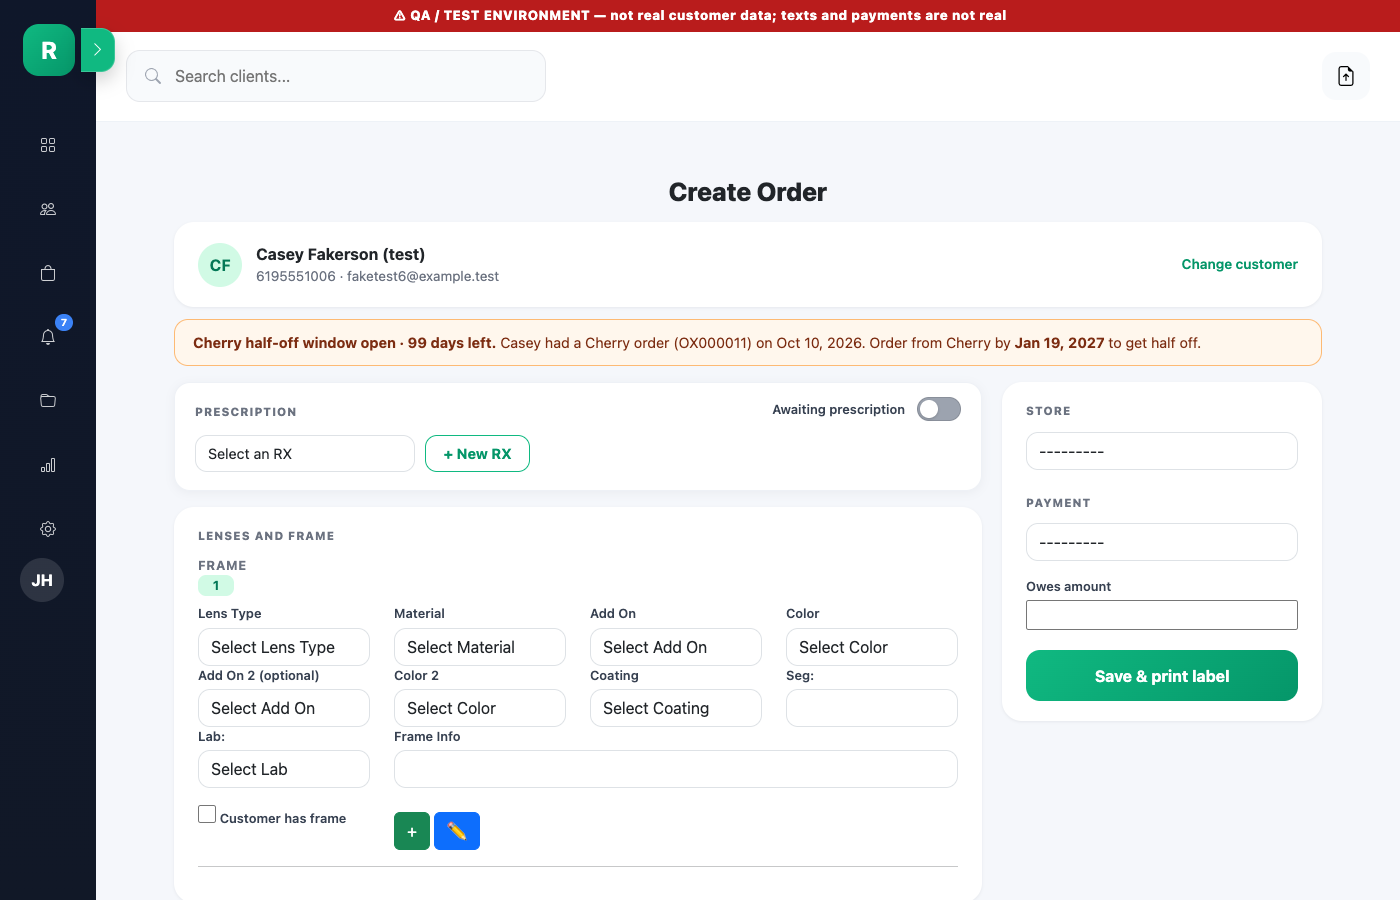
One button, Save & print label, now saves the order, texts the customer, opens the label, and takes you to the customer's profile.
Rx order, step by step
- Click Create Rx Order on the home screen, or Create order in a customer's box. Search for the customer and click their row.
- In the Prescription card, pick their RX. Its details open when you select it. Click + New RX if they have a new one.
- No prescription yet? Turn on Awaiting prescription (see Awaiting RX).
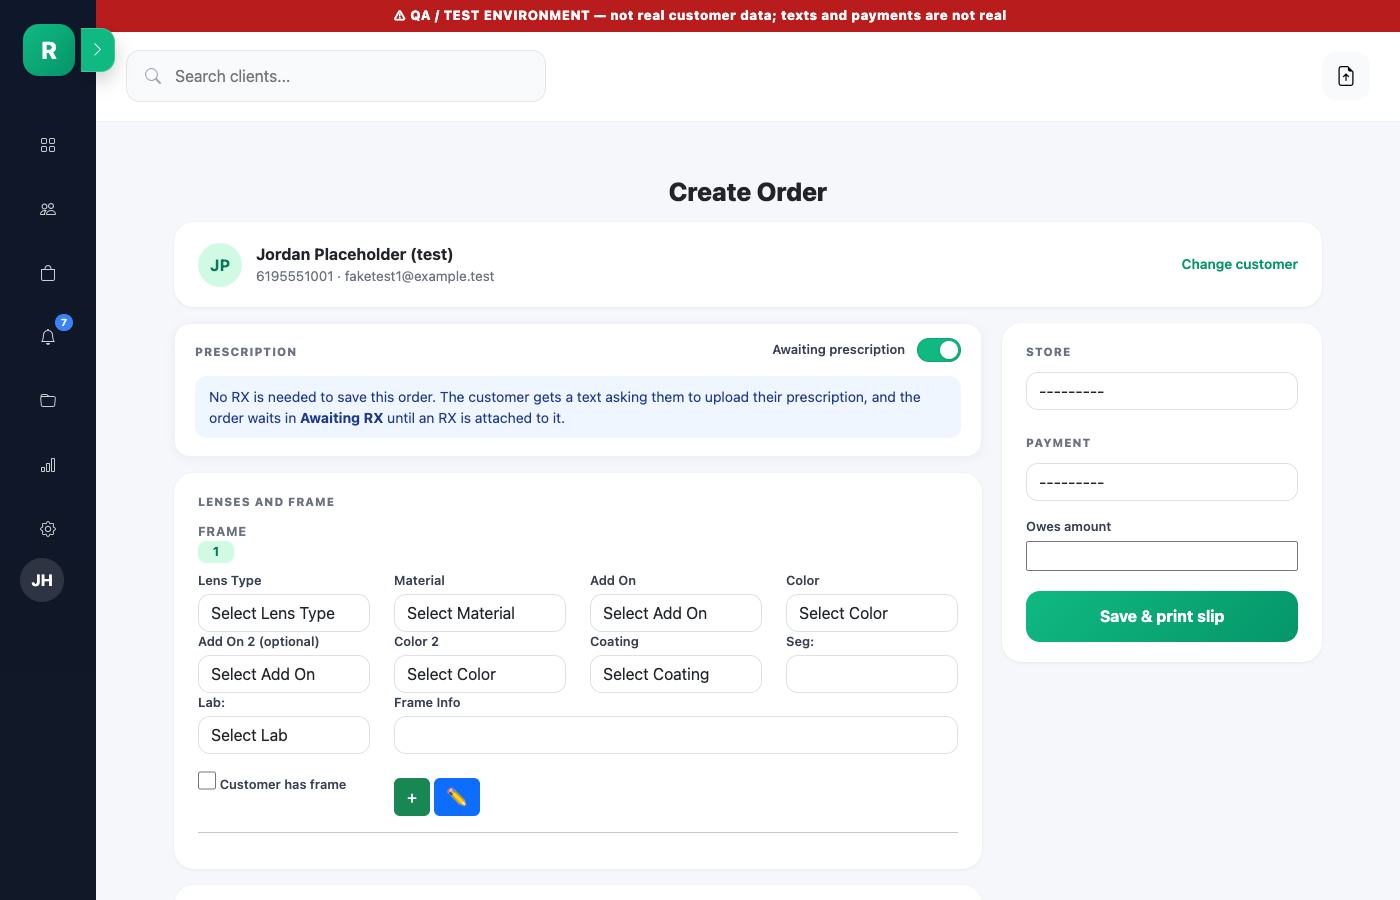
- For each frame, choose lens type, material, add-on, color and coating. A second add-on is optional.
- Fill in Seg, Lab (Opticom, Cherry or Same-day) and Frame info.
- Turn on Customer has frame if the customer is keeping their frame while the lenses are ordered. Turn on Ship to customer and enter the address if it ships.
- Set the payment status, then click Save & print label.
- The label opens in a new tab, and this tab goes to the customer's profile. If your browser blocks the new tab, the order is still saved. Reprint it from the profile.
Entering an RX
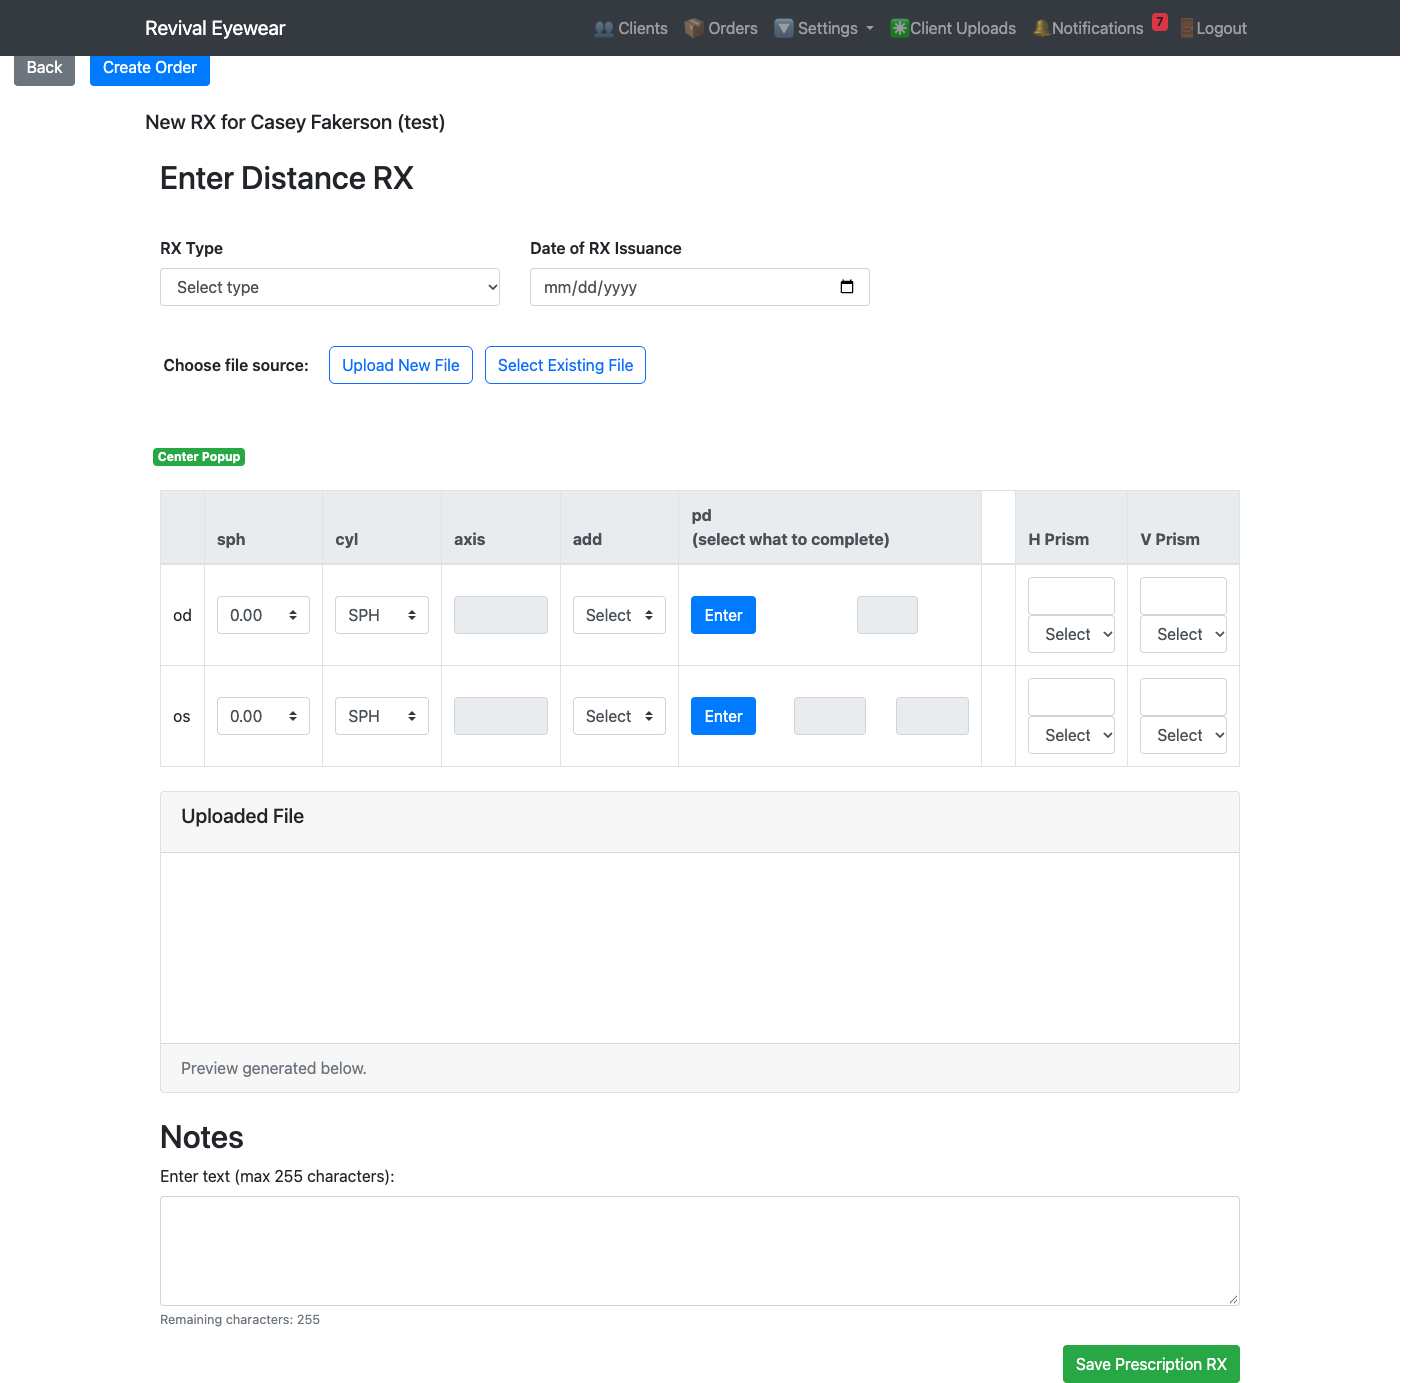
- RX type and issue date are required. The expiration is set to 2 years after the issue date.
- Every prism number needs a direction.
- A PD total is split into exact halves automatically. Halves accept .25 steps.
- Computer and Reading RX types were removed.
New RX: click + New RX on the profile or the order form. Choose the RX type and issue date, attach the prescription file (upload a new one or pick an existing one), fill in the values, and click Save Prescription RX.
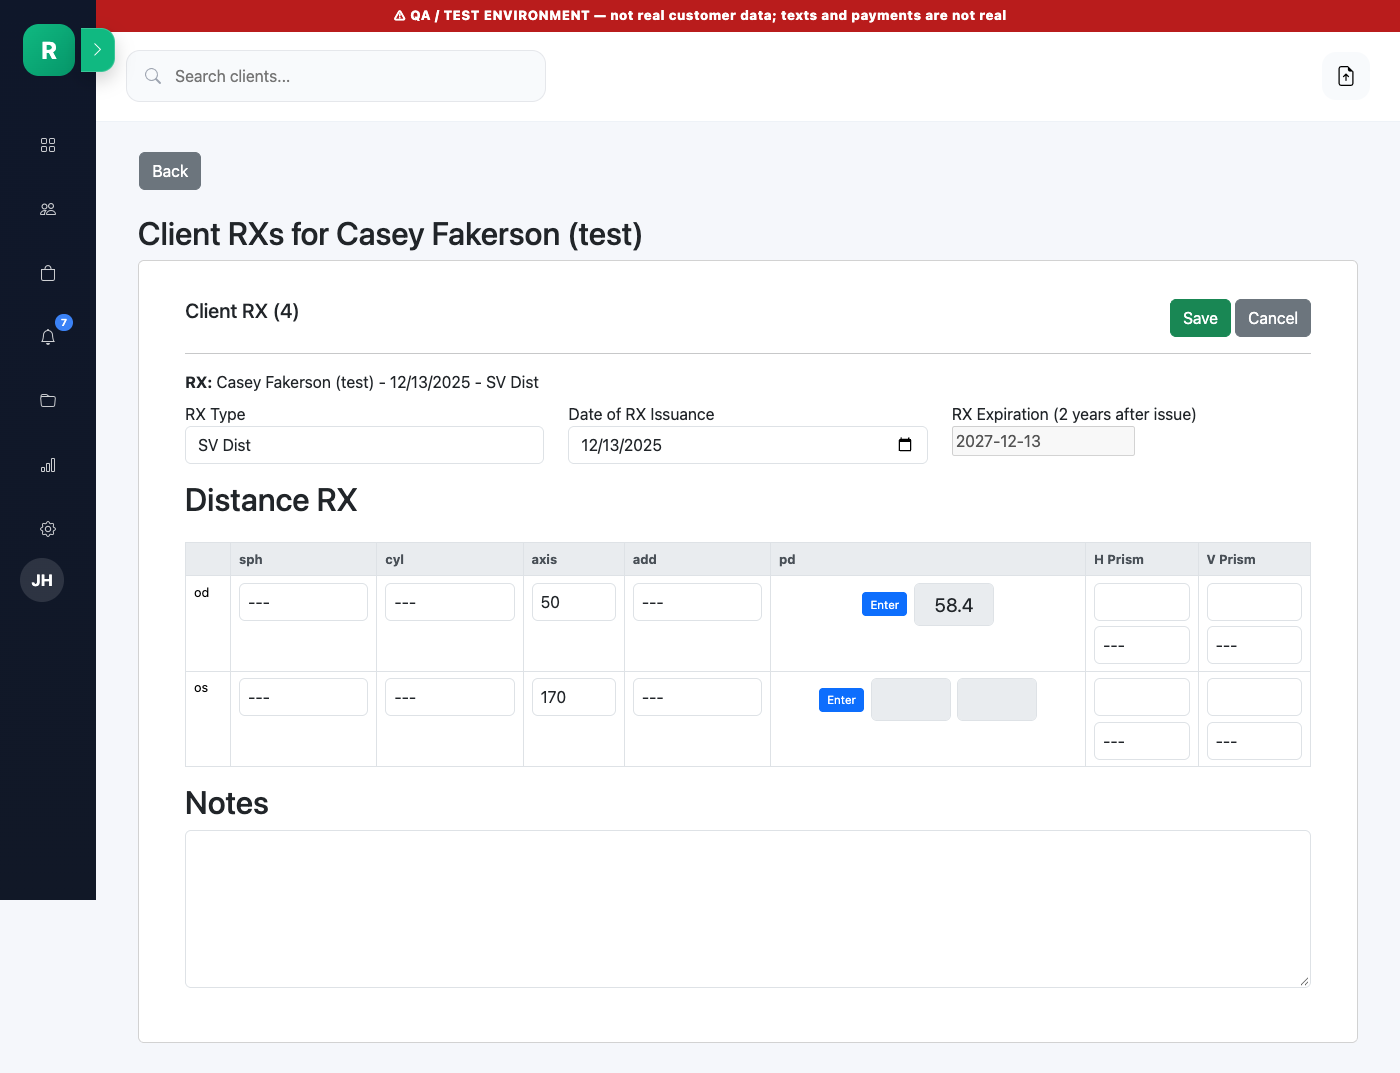
Edit RX: open the RX from the profile (View Details or See RX). The values become editable right on the page; change them and click Save, or Cancel to leave it as it was.
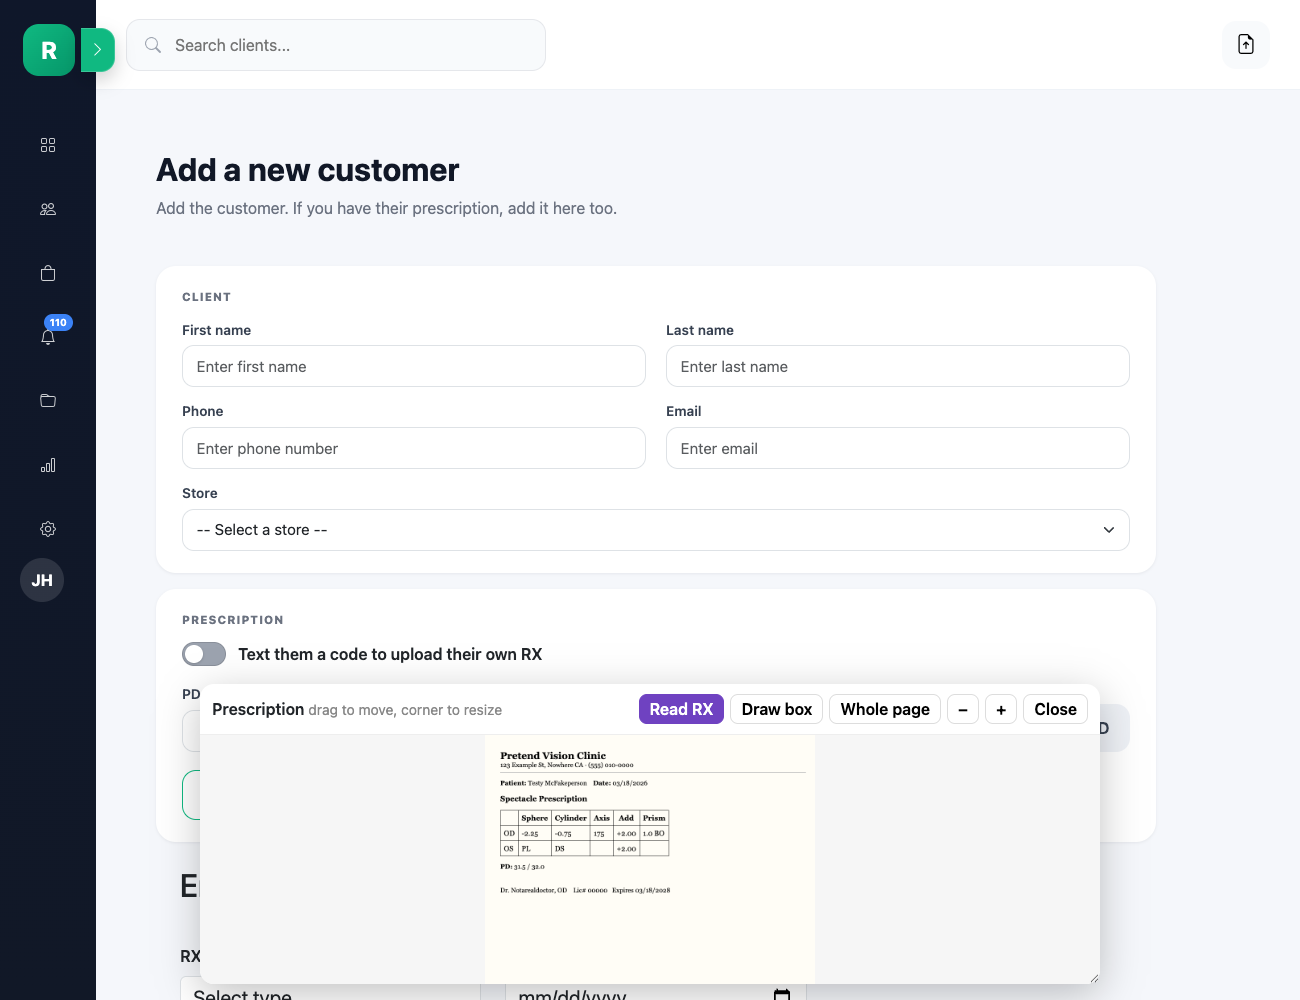
Read RX: fill the RX from a photo or PDF. On New RX and Add Client, the reader can type the prescription in for you. You still check every number before saving.
- Choose the file (a photo, PDF, or a saved file from the list). The prescription panel pops up at the bottom of the screen.
- Click the purple Read RX button at the top of the panel. It takes about 10 seconds.
- The boxes it filled turn yellow. Check each yellow box against the prescription, fix anything wrong, and type the Date of RX Issuance if it's empty.
- Click Save Prescription RX.
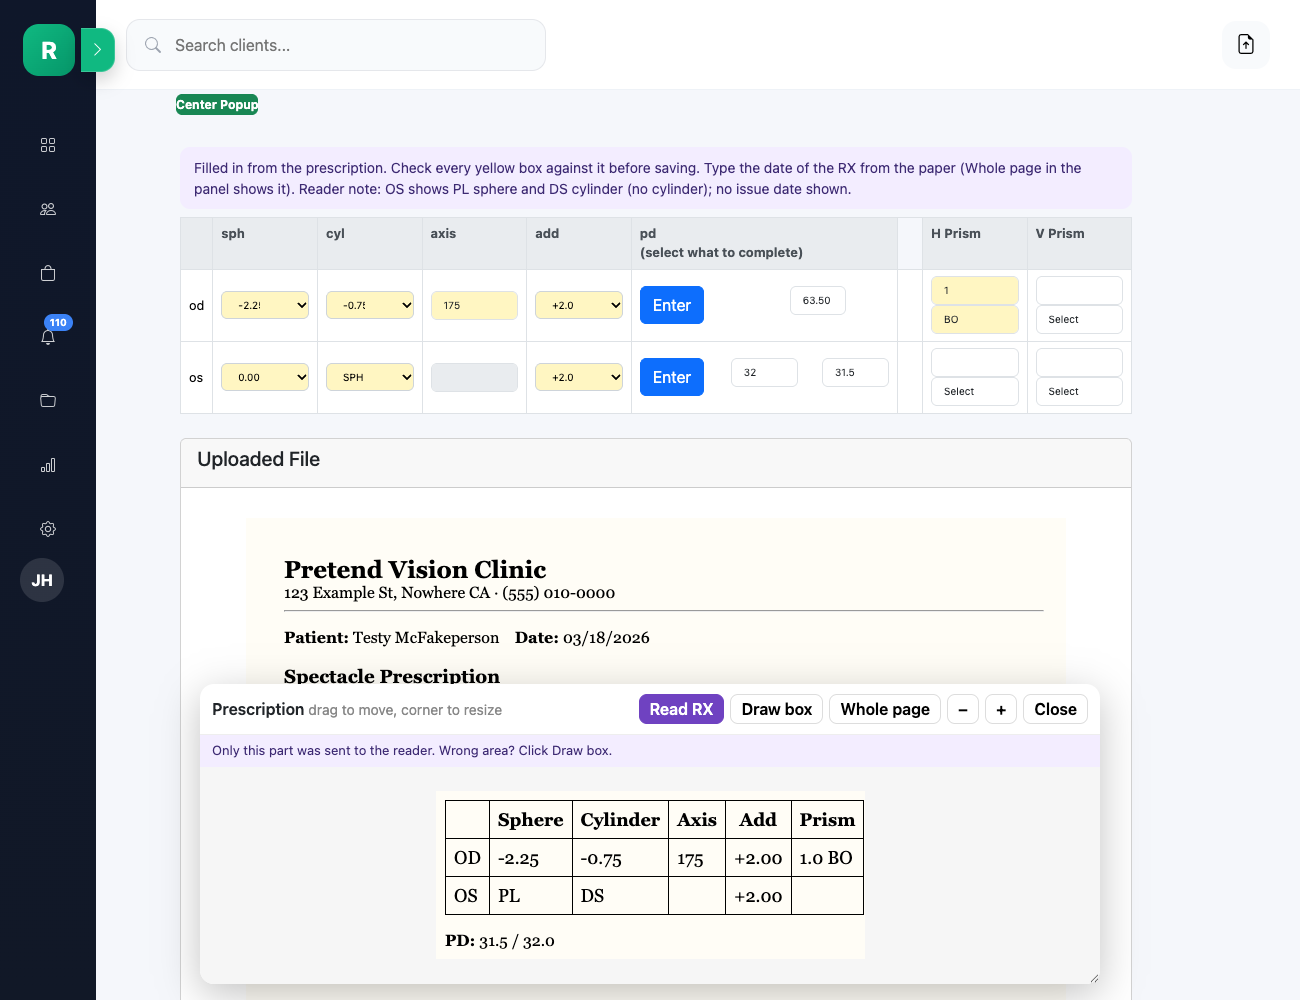
What gets sent: only the numbers part of the prescription. The panel shows exactly what was sent ("Only this part was sent to the reader"). The customer's name and address stay on this computer.
If it asks for your help: a purple box at the bottom of the panel shows 2 steps. Click and drag a box across the numbers (Sphere, Cylinder, Axis, Add, PD), leaving out the name, then click Read these numbers.
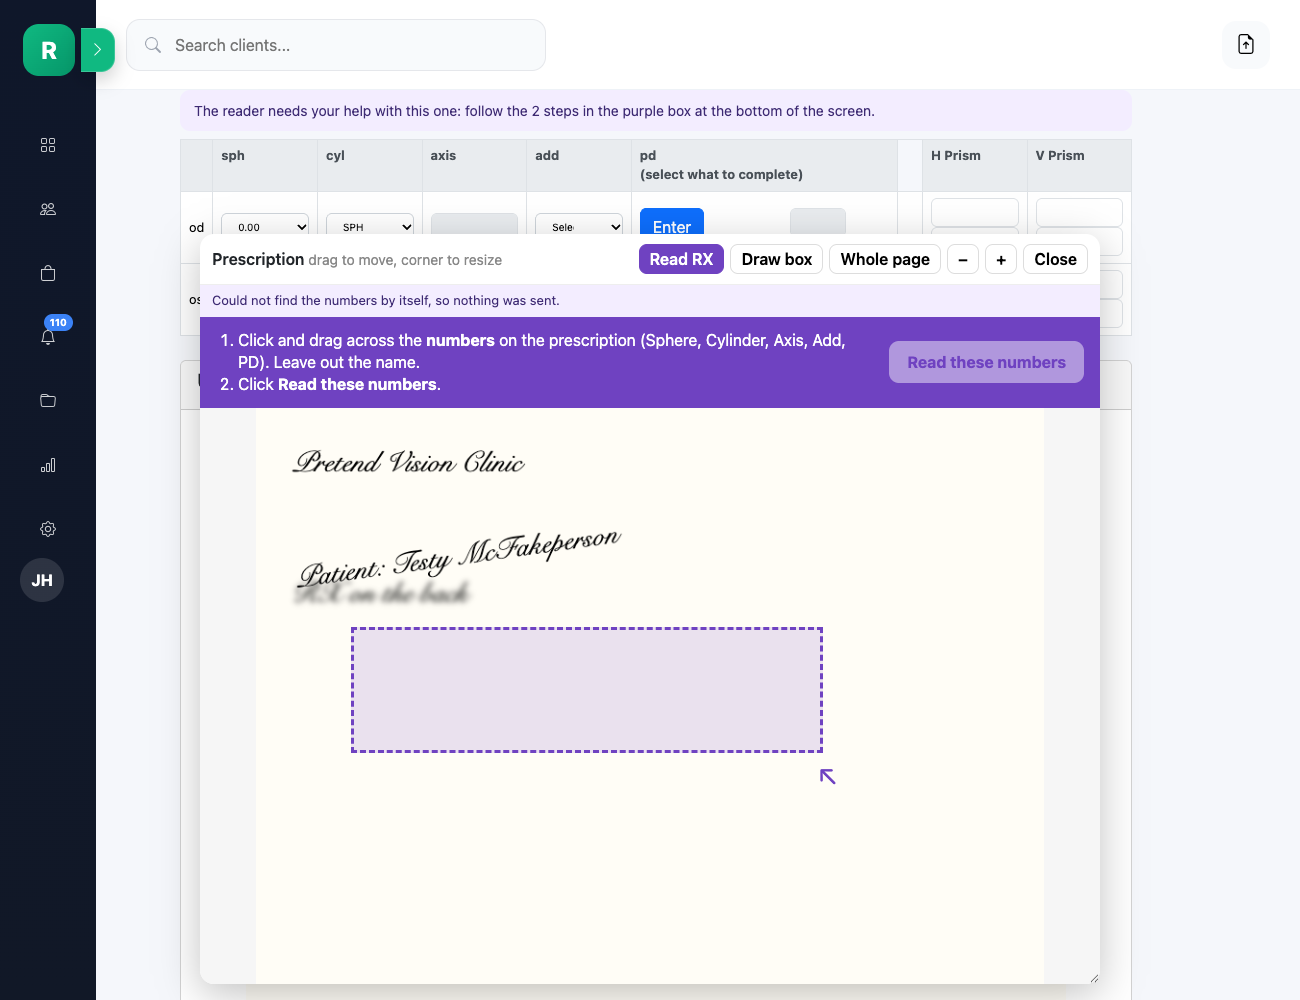
Panel buttons: Draw box reads a different area, Whole page shows the full prescription, − and + zoom, Close hides it. Drag the title bar to move the panel, and the corner to resize it.
- A PD marked OD (or R) goes in the right box, OS (or L) in the left.
- iPhone HEIC photos need to be saved as JPG first.
- Handwritten or blurry prescriptions may not read. Type those in by hand.
Non-Rx order (formerly Quick order)
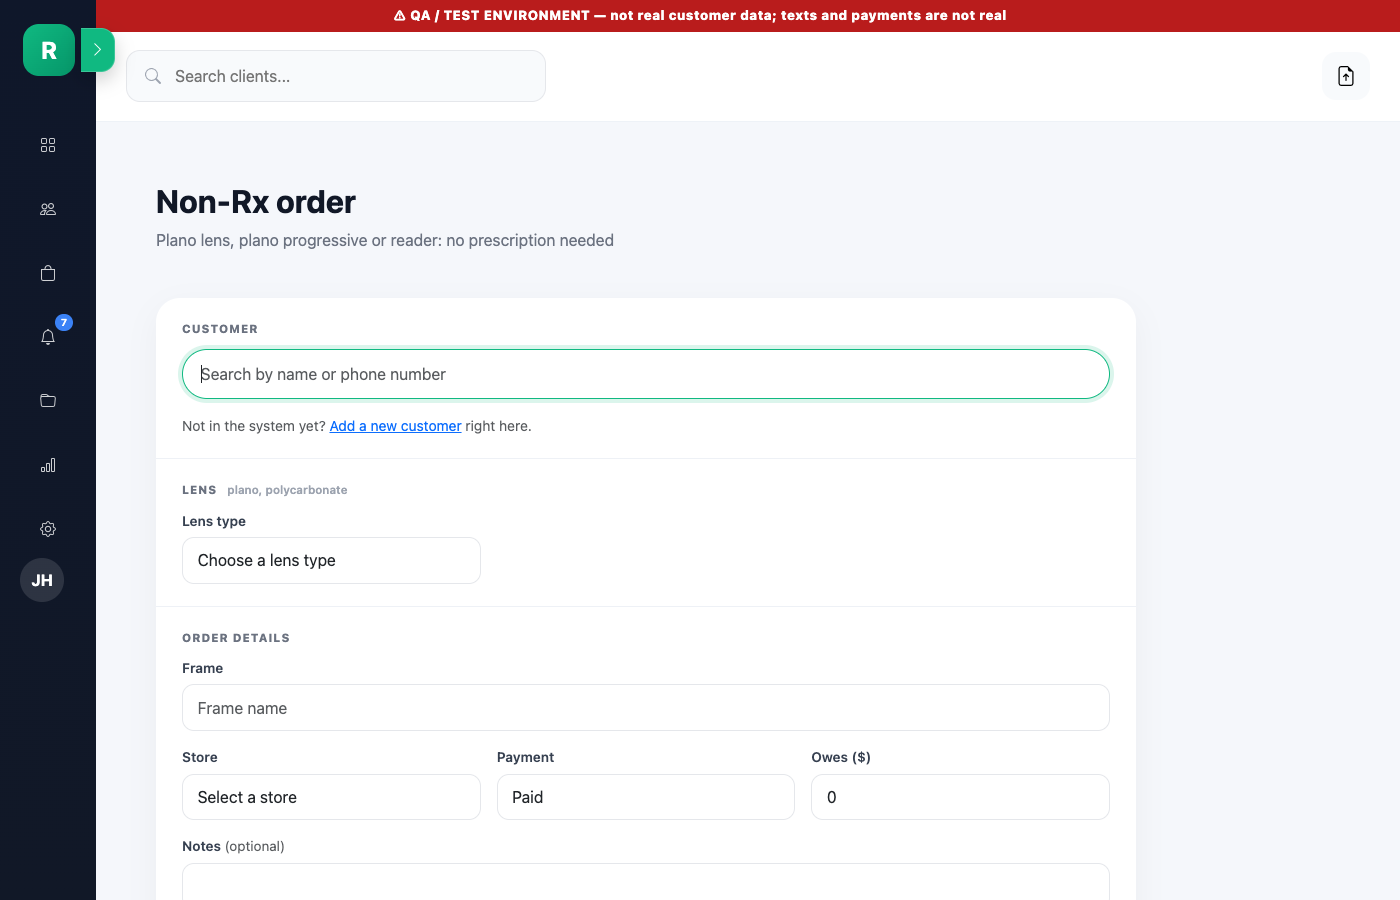
Use it for plano, transition, reader, and plano progressive lenses with an add of +1.00 to +3.00. The material is always polycarbonate. Enter PD and power where asked, mark Lens Unpaid if needed, then click Save & print label.
Reading the label
The 4x6 label folds into thirds: notes, shipping and owes on top; the lens details in the middle; RX, patient and lab at the bottom. Anything unusual shows as a black flag in the top bar, on the diagonal line, and in small tags.
| Flag | What to do |
|---|---|
| UNPAID LENS UNPAID FRAME UNPAID | Collect payment before handing over |
| AWAITING RX | The customer hasn't uploaded their RX yet. Don't order the lenses. Watch for their upload: the order gets a purple UPLOAD RECEIVED badge when it comes in (see where uploads show up). |
| SHIP | Ship to the address on the label |
| PRISM | Double-check the prism values |
| +CYL | Plus-cylinder RX; double-check |
| CUSTOMER HAS FRAME | The customer kept their frame. When the lenses arrive, text them to come in for a lens swap, and set the tray next to the machine in the lab. |
| CHERRY 1/2 OFF | Tick Multi Pair Discount on the Cherry platform; check the invoice shows 50% off (see Cherry half-off) |
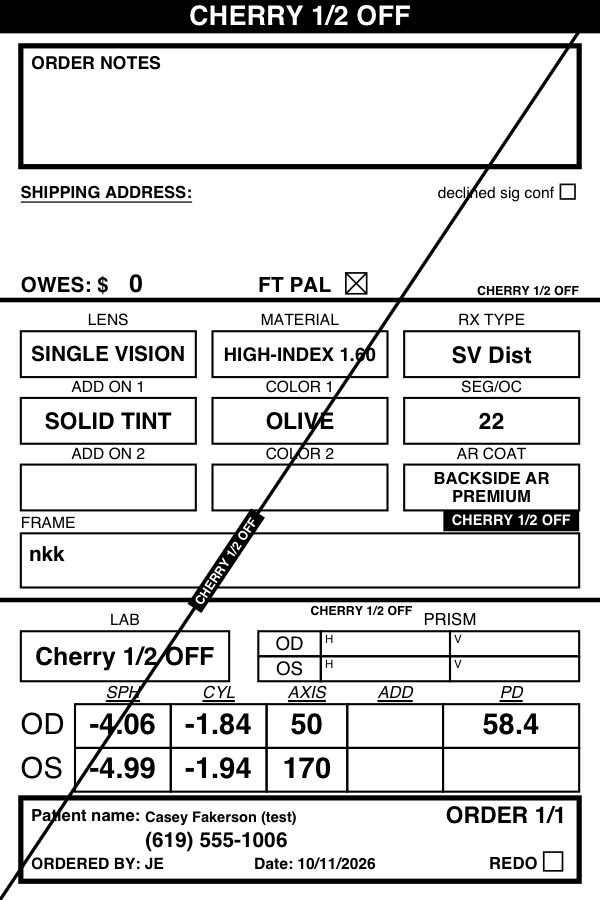
"Ordered by" shows the initials of the person who created the order.
Awaiting RX orders
You can now take an order before the prescription arrives. It starts automatically when you enter the RX.
- On Create Order, turn on Awaiting prescription. No RX is needed.
- Click Save & print slip. The Awaiting RX slip opens in a new tab, and this tab goes to the customer's profile. The label can't be printed until the RX is in.
- The customer gets a text with a link to upload their prescription and their Revival code.
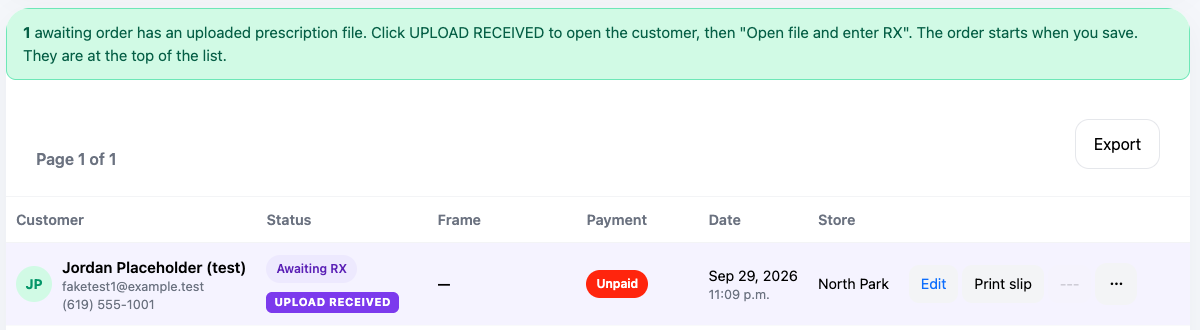
- When they upload, the order shows a purple UPLOAD RECEIVED badge. Their profile shows "[Name] uploaded a prescription," and the notification count goes up.
- On the profile, click Open file and enter RX. Type the values in and save.
- Saving the RX attaches it to every order waiting for it and moves them to Work in Progress. The customer gets one "your order is in progress" text with a status link.
- Now print the label from the profile.
When the RX comes in: where you'll see it
When a customer uploads their prescription for an awaiting order, it shows up in six places:
- Home screen: a purple banner above the customer list says how many customers uploaded a prescription. Those customers are at the top of the list with a purple UPLOAD RECEIVED badge under Awaiting RX. Click the badge to open their profile.
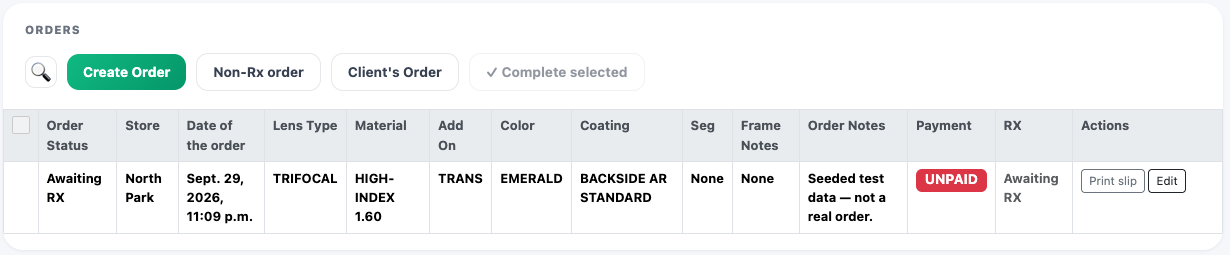
- Orders page: a green banner at the top says how many awaiting orders have an uploaded prescription. Those orders jump to the top of the list with a purple UPLOAD RECEIVED badge. Click the badge to open the customer.
- Upload icon, top right (the file with an up arrow, next to the search bar): a number badge counts new uploads. Owners can click it to open the Client Uploads list and mark each one as read; for everyone else it goes back to the home screen.
- Notifications bell: the count in the sidebar goes up, with the customer's name and store.
- The customer's orders box (click their row on the home screen or Clients page): UPLOAD RECEIVED shows under the order's status.
- Customer profile: a banner at the top says "[Name] uploaded a prescription" and which order it's for, with an Open file and enter RX button.

The upload icon and the bell count every customer upload, even when no order is waiting for it yet. If there's no awaiting order, open the customer's profile to see the file.
Click Open file and enter RX. The uploaded file opens right below the RX form so you can read it. The reader starts filling in the numbers by itself (see Read RX above). Check the yellow boxes, pick the RX type and issue date, and click Save Prescription RX. The order moves to Work in Progress, and you can print the label.
If the prescription comes by fax, email, or from the doctor instead, just enter a new RX for the customer. Their waiting orders start the same way.
Texts customers get
| When | Text |
|---|---|
| Awaiting order saved | Thanks for your order; upload your prescription here; your Revival code |
| Order started | Your order is in progress; check status with your code |
| Ready to pick up | Your order is ready at [store] with hours; call the store with questions |
| Shipped | Your order shipped with [carrier]; tracking number and link |
Customers marked as not receiving SMS get no texts; their profile says so at the top.
The customer profile
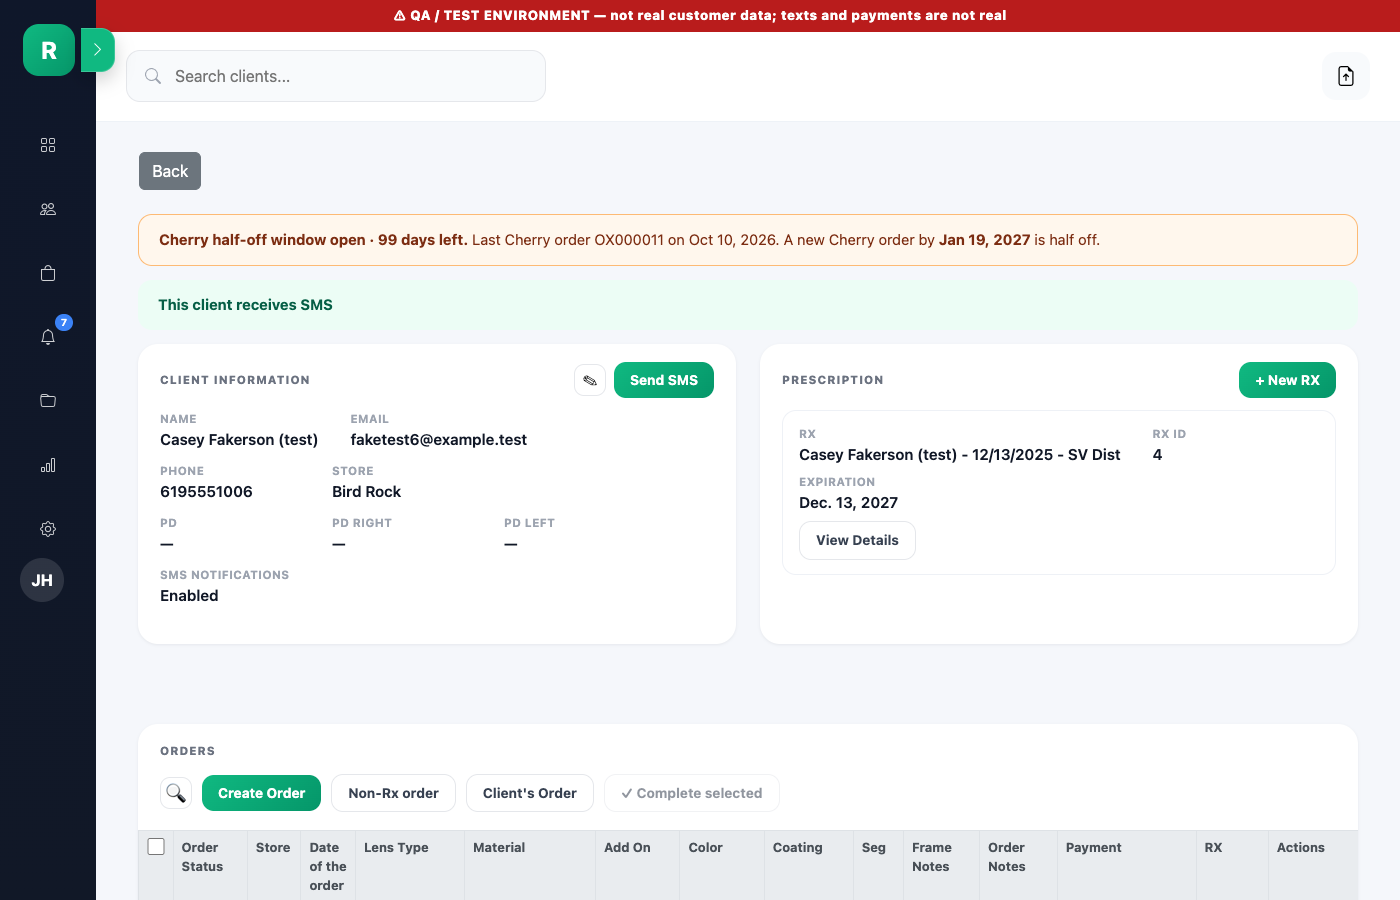
The profile is now the main place to manage a customer's orders: print, complete, dispense, edit, and ship all happen here.
- Banners at the top tell you what needs attention: an uploaded prescription, the Cherry half-off window, and whether the customer receives texts.
- Client Information, Prescription and Orders cards have the new design. Uploaded RX files open right from the profile.
- Non-Rx order starts a Non-Rx order for this customer.
- In the Orders list, each order shows See RX, Awaiting RX, or No RX needed, plus what the customer still owes.
Moving an order along: print, complete, dispense, ship
Every order moves through the same four statuses, and each button on the profile moves it one step.
- Awaiting RX: waiting for a prescription. Print slip prints the Awaiting RX slip.
- Work in Progress: at the lab. Print label prints it; Reprint label prints it again. Print all prints every frame in a multi-frame order as one PDF.
- Ready to pick up: click Completed to mark it ready. This texts the customer, so print the label first; the button stays unavailable until you do. To finish several at once, tick them and click Complete selected.
- Picked up or delivered: click Dispensed when the customer has their glasses.
Editing and deleting
- Edit is available only while an order is Awaiting RX or Work in Progress.
- Deleting a frame keeps you on the same order page. The frame renumbering is noted in the activity log.
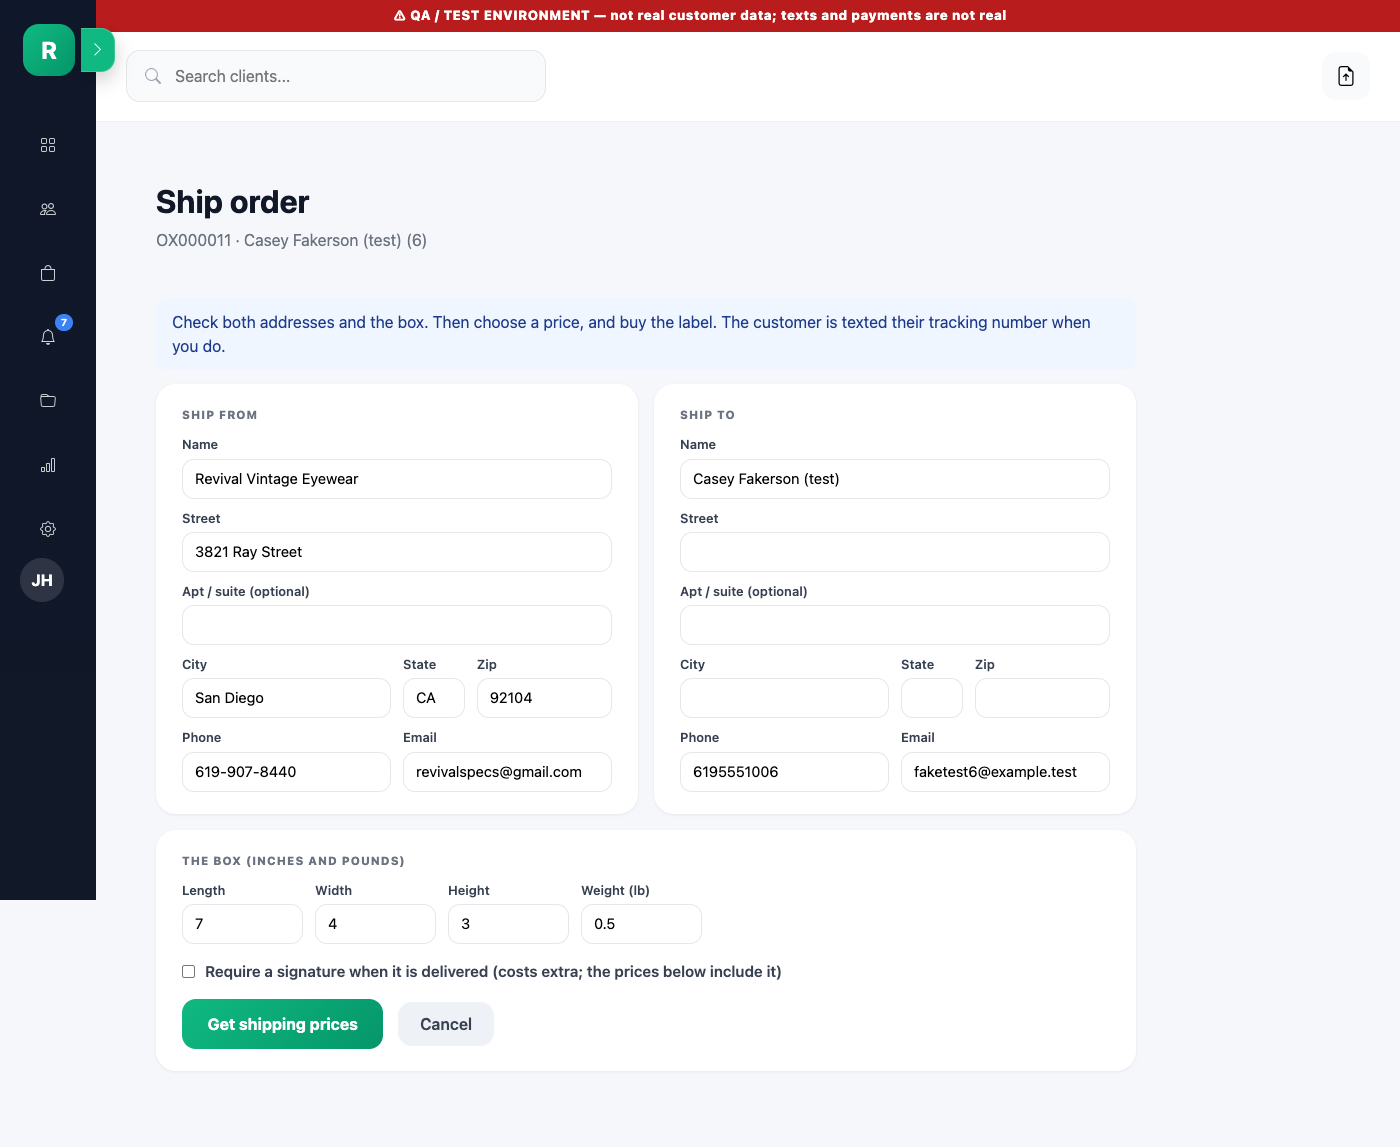
Shipping an order
- Click Ship on the customer's profile.
- Check Ship from. It defaults to Revival Vintage Eyewear, 3821 Ray Street, San Diego.
- Check Ship to. It fills in from the order's shipping address; fill in anything missing. Every box except Apt / suite must be complete before prices appear.
- Check the box size and weight. They default to 7 x 4 x 3 inches, 0.5 lb.
- Tick Require a signature if needed. It costs extra, and the prices shown include it.
- Click Get shipping prices, choose one, and buy the label.
- The tracking number is saved on the order and texted to the customer. Hover over Tracking on the profile to see it.
Cherry Optical half-off reorders
Cherry Optical charges us half for a customer's next order placed within 101 days of their last Cherry order. The app now reminds you.
Internal only. This is Cherry's discount to Revival, not a customer discount. Don't mention it to the customer.
- Orange banner: when you open the customer's profile or start an order for them, an orange banner shows how many days are left and the deadline.
- On the label: a Cherry reorder inside the window prints CHERRY 1/2 OFF in the top bar, and Cherry 1/2 OFF in the LAB box.

What to do
- Always set Lab = Cherry on Cherry orders. The alert only knows about orders where Cherry was picked.
- When you place the order on the Cherry platform, tick Multi Pair Discount.
- When the Cherry invoice comes in, make sure we got 50% off that order.
How the 101 days are counted
- From the day the earlier order was placed. If it was an awaiting order, the count starts the day its RX came in.
- Orders still Awaiting RX don't count.
- Two pairs in the same order don't count as a reorder.
Owner tasks
Only accounts marked as owners can do these. Other staff see "Access denied."
Add an employee
- Open Create user. Enter their name, username, and a temporary password.
- New accounts must set their own password at first login.
- Open Assign PIN, pick the employee, and save. The app picks a random unused 4-digit PIN. Tell the employee what it is.
Manage existing users
- On Manage users, you can change someone's details, set a new password, or tick must reset password to make them choose a new one at next login.
- To change a PIN, assign a new one on Assign PIN. Every PIN must be unique.
Edit customer texts
The Awaiting RX, Order started, and Shipped texts can be reworded on the Text messages admin page. Keep the words in curly braces, like {code} and {upload_link}; the app fills those in.
Quick reference
| If you need to… | Do this |
|---|---|
| Start an Rx order | Home → Create Rx Order → search → click the customer |
| Start an order without a prescription | Create Order → Awaiting prescription → Save & print slip |
| Order readers or plano | Home → Create Non-Rx Order |
| Enter an uploaded RX | Profile → Open file and enter RX |
| Reprint a label | Profile → Reprint label (or Print all) |
| Tell a customer their order is ready | Profile → Completed (sends the text) |
| Hand over glasses | Profile → Dispensed |
| Ship glasses | Profile → Ship → pick a rate → buy |
| Get back in after the screen locks | Enter your 4-digit PIN |
| Forgot your password or PIN | Ask an owner |
Common questions
- The label won't print. The order is still Awaiting RX. Enter the RX first.
- Completed is greyed out. Print the label first.
- I can't find the Edit button. The order is already Ready to pick up or Dispensed. Ask an owner.
- The new tab didn't open after saving. The order is saved. Reprint the label from the profile.
- A Cherry reorder didn't show 1/2 OFF. Check that Lab was set to Cherry on both orders, and that they're within 101 days.
Knowledge check
9 quick questions on what you just read. No grade: tap an answer to see why it's right or wrong. Sign in with your Training Portal name and PIN so your manager can see you finished.
That name and PIN don't match. Try again, or ask a manager.
Signed in as . Not you?